Sunday 27 November 2016

Rigging boards part #2

This week-end I mainly worked on the rigging board assemblies.

Took a few runs of measure+position+glue+clamp+nail+watch glue dry+repeat until all boards were assembled. I did this at home since it's getting chilly in the hangar and the "watch glue dry" step would have taken longer:


I waited until I had the leading edge stops glued in place before drilling the 1/4" hole for the pivots. This way I could directly measure the 25 15/16" distance for this pivot (see drawing in previous post). Here's the almost final product:


Here's what it looks like on the wing:


I plan to paint 2 of them red and one white as suggested in the instructions. This way it creates a better contrast when looking boards against each other.

Thanks to Bill on BiplaneForum.com for the great plans and instructions. Thanks also to my friend Richard for letting me use his table saw : )

Sunday 20 November 2016

Rigging boards part #1

In preparation for the wings rigging, I started building rigging boards using the plans made by Bill on Biplane Forum. Wasn't sure which kind of wood to use; I finally chose plywood since it's a good compromise between price and and stiffness.

I don't have much woodworking tools so I had the long cuts and 3/8 radii made by a wood shop close to work. All holes and angle cuts were still to be made when I picked up the parts. I used a 1/2" Forstner bit to cut the opening in the 20" bar that swivels:


Then I converted my drill press into a mini milling machine by using a router bit and set the belts to fastest speed:


The rest of the parts were pretty easy to make. I could use my friend Richard's table saw to make the angle cuts:


I made enough parts for 3 boards as recommended on the plans. Next step: the assembly!

Monday 7 November 2016

Fuselage panels

Another quick post to mention that I reinstalled most of the fuselage panels. Had to trim a little bit the side panels around the gear area since it shifted forward about 1/16".


Still need to install the cabane panel and bottom panel... The wall of parts on the left is getting empty. I like where this is going!

Sunday 6 November 2016

Fuel System Installation #4 (of 4)

Quick post to say that today I finished the fuel system installation. I was waiting on the wings to connect the vent, drain and feed lines of the aux tank.

Here's what I see now when I get in the hangar!


Had to make new lines since I changed the routing of both the vent and drain lines. This one is the bottom half of the drain line... Pretty long to bend to what I needed.


The clear tube sections on the above picture are leftovers from my fuel sight tube (1/4 ID Tygon) I used as anti-chafing for areas close to other parts. Always better to think about this before doing the flares : )

I should be ready soon to reinstall the fuse panels...

Saturday 29 October 2016

Wings

Finally, the time to put the wings back on came. They have been sitting on a rack since 1½ year, waiting to go back where they should be. Here's a shot of their last minutes on the rack, once I removed the accumulated dust:


With dad's help, I carefully moved back Luc's S2 and prepared the fuse (I always feel guilty of touching someone else's plane):


Then my friends Danny and Luc arrived and helped us for the big work! Here's a shot of myself in front of a monoplane:


Once the top wing was holding in place, We installed what made it a biplane : )


Then the I struts:


I kept all the wires and hardware loose for now since I didn't need a full team to rig the wings. We proceeded with the disassembly of the wings rack to make more space. This allowed us to put back the airplane on its original spot. The feeling was awesome.  

Huge thanks to Danny, Luc and my dad to help me out. It was an enjoyable afternoon during this rainy Saturday. 

Electrical + Master cylinders + Preparation for wings

Been a while since my last post, but I have been pretty active on the Pitts over the last month.

Electrical system


My objective was not to redo the whole electrical system although it wasn't exactly what I wanted. I replaced damaged terminals, replaced wires that had more than one splice, etc. I was surprised to find that my fuel boost pump wires were not protected (!). I fixed what I couldn't resist to fix, but I keep the revamp of my electrical system for another time and focus on the reassembly.


The old wiring was a little hairy so I made nice bundles with lacing like my friend François. One day I will make a new instrument panel with digital oil temp/pressure and fuel pressure. I don't really like the idea of having a hoses with pressurized fuel and oil going aft of the firewall, but I will keep this as is for now.

Master cylinders

While my fuselage was being welded last summer, I took the master cylinders home and changed all the o-rings. It was a good thing since they were pretty dried up. In the process of doing this, I realized the roll pins that hold the spring in place were not in good shape so I ordered new ones (see item #16 below).


I recently pulled back the box with the two master cylinders and reinstalled them on the airplane. It took a few adjustments to ensure proper geometry since the attachment points were replaced. The old bolts were secured with AN365 lock nuts which is not per AC43.13 for elements in rotation. I therefore replaced them by drilled bolts with castle nuts and cotter pins. I didn't change the brake hoses, but keep this on my list for next winter!


Preparation for reinstallation of wings

One night after work I came to the hangar and realized I was out of things to do on the fuselage. After more than 18 months of on/off work, I must admit it was a strange feeling! I decided to make a small plan to prepare to put the wings back on. Replacing the AN665 clevis hardware since the old one was getting corroded was part of it:


Since the removal of the top wing had been difficult with only 2 guys, I decided to plan for at least two other people to help me out to reinstall it: two holding the tips while one putting the bolts on the cabane...

Sunday 11 September 2016

Instrument Panel + Propeller Installation

Been working quite a bit during the last month but didn't take time to update the blog!

I reinstalled the instrument panel in place, just with a few screws to hold it in place until the reinstallation of the side panels. That wasn't too long since most of the instruments were already in place:


On the top right corner of the above picture, you will see a hole aligned with the Tygon tube holder for fuel level indication. This is where the tube used to pass through. The problem with this setup is that I couldn't read the fuel level until the first ~3 gallons were burned from a full tank. I therefore relocated the hole on the panel to a higher location (above the tach).

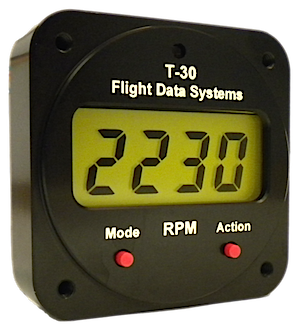
When I was routing all the wires + hoses through the firewall, I found the tach cable to be very cumbersome. The minimum radius was large and there is always a risk of having an oil leak where the seal is located at the engine attchment point (which recently happened to my friend Chuck!). I therefore decided to switch for a T-30 electronic Tach. It removed the need for a mechanical cable, it's lighter and monitors both mags via the P-leads,


I blocked the tach port on the engine side using the Andair tachometer cap. It seemed to be easy to install at first but access was difficult so I had to remove the SD-8 alternator to screw the cap in place and lockwire it.

Another great visible progress is the installation of my freshly overhauled Prince P-Tip propeller!


Nice view on the S-2C I'm sharing the hangar with:


It was overhauled at the Prince factory a few months before I discovered about the fueselage crack last year. Been sitting on a shelf since then. Thanks to Lonnie Prince for the great support and to my friend François for the help to reinstall it! After taking these pictures, I lockedwired the prop bolts and installed the spinner.

Another visible progress: the installation of the canopy! Felt great to see it back on the airplane after a good clean up.


Finally, I took the time to build a small bracket for my radio. It used to be held with 27 turns of electric tape around the tube. It did hold in place but... I prefer my new bracket! Big thanks to my friend Scott for letting me use his band saw and his brake.


I'm waiting for an order full of wires and connectors to finish my electrical system installation which is next!


Saturday 20 August 2016

Fuel System Installation #3 - Vents and Siphon Valve

Been working on the fuel system this week. All the fuel lines, vent lines and drain lines are done except the ones that will connect to the wing tank.

Here's an example of two vent lines that I finished today. I used tie-wraps and scrap pieces of rubber tubing as spacers between the tubes:


These two lines were originally passing just beside the fuel tank without going through the aluminium bracket. They were so long that I had to bend them every time I needed to remove/reinstall. I therefore decided to add bulkhead fittings (see top of the picture above) I found cutting the tubes in two halves is much easier to work with and also more convenient if I ever need to remove my main tank again.

Another new feature I installed is the siphon valve in the vent interconnect line between the header tank and main tank (see diagram here). It's a great idea suggested by my friend Mark Wood down in Wichita in order to avoid too much fuel being transferred back into the main tank while inverted. It is quite simple, avoids buying an expensive check valve and allows higher vent flow than a typical vented check valve. It is made by assembling two AN816-4D fittings in a AN910-1D NPT coupling with a ball in the middle. The only modification to be made is a castle shape on the bottom fitting to allow air to flow in the upright position. This is reasonably easy to do with a file. See below:


Here's what it looks like once installed on the airplane. Assembly to be secured with either Adel clamps or Koroseal lacing.


Next task is to start reconnecting wires. Stay tuned!

Sunday 7 August 2016

Throttle and Mixture cables

Ran out of fittings to continue the fuel system installation so I decided to work on installing the throttle and mixture cables. My cables used to be secured with loose tie wraps, which obviously I didn't like. I therefore installed Adel clamps like this on two places. This got me a nice, tight installation:


I found these Adel clamp installation pliers at Oshkosh last year. They came with a sharp stick to line up the clamps together. They work quite well and save me some time:


The old firewall installation was grommets + a huge blob of RTV sealant. While the engine was still under the crane, I planned to replace that with two Cable Safe II bulkhead fittings. The advantage of these fittings is that they split into two halves so that you can install them on cables that already have crimped terminals on both ends. Here is the final result:


Both cables were manufactured by ACS. when I removed them last year, I found that all grommets on them were dry and cracked. I was pleased to see that Spruce had them for sale (see here). I therefore replaced all four of them (one on each end):


I was quite happy once the cables were all secure, free of interference and chafing. It took my a few iterations to make sure I had the full travel and that the controls in the cockpit were where I wanted them.

Fuel System Installation #2 - Header Tank

Got my flop tube back from my friend Scott. It now has a total OD of 0.900" which allows it to get in my header tank!


It took some time to reinstall the header tank back in its right place, but it's good to have it back:


I replaced the old Tygon tube by this yellow one which is fuel resistant (ordered it from US plastic).


The GMAC distraction ; )


Been a while since my last post. Went to help the team at the Green Mountain aerobatic contest in mid July. Two of my friends came back with pieces of wood in the baggage compartment! Congrats to Philippe and Luc; you've done an awesome job!

Philippe with his Superb D:

Luc receiving his prize:

My friend François helped as a judge:


It was great to see airplanes that fly. It gave me some motivation to continue my project!


Tuesday 5 July 2016

Fuel System installation #1

Been  working on the fuel system recently. Last year I bought a new flop tube for the header tank. I decided to change it for two reasons: 1) To shorten it so that it gets closer to half the length of the tank and 2) because the old flop tube was very stiff and probably 10+ years old. Here's the comparison between the old and new flop tube once I cleaned and transferred the attachment fittings:


I used fuel lube for both NPT fittings. Once I was ready to reinstall it in the header tank... Doh!!


I gave the tube to my friend Scott for him to remove about 0.040" on the OD of the brass end with his lathe. In the meantime, I started installing the boost pump, fuel filter and some tubing in between. It feels so good to take components from the shelves back on the airplane. Here's my little progress so far:


As a followup to my post on the side panel brackets,  I finally decided to change all the nutplates on the vertical brackets as well. The access was bad on some of them and required the use of one lug nutplates (K2000-3).

Anxious to get the flop tube back from Scott and resume my fuel system installation!

Monday 27 June 2016

Fuel System Modifications

Being still abroad for work, I worked a little bit on my new fuel system diagram. As explained in this post, I had two different issues with the previous design that made me make some changes. I will explain a little more the reasoning behind each fix.

Fix #1: To solve the fuel siphoning problem

The fix for this problem is to install a vent interconnect between the two tanks. This way, if siphoning happens following an overfill, it will only siphon until the fuel level reaches the level of the vent port on the main tank i.e. minimum fuel loss.

A downside of this is that it allows the fuel in the header tank to flow back into the main tank while inverted. To prevent this, I will add a check valve on the vent interconnect line. It is important that the check valve be vented so that air can flow in both directions. Here is a picture to better visualize the change:


Fix #2: To solve the potential fuel starvation issue

This problem is more important, but the fix is simpler. Instead of feeding the pump inlet directly when using the aux tank,  I will connect the aux tank to the main tank, therefore eliminating the risk of feeding air from the aux tank to the engine:


I also made a small change to the fuel level indicator: the bottom end will now be connected to the header tank purge line. This will allow me to read fuel level down to the header tank level.

Modified top level diagram

The above is how I intend to connect the lines during the rebuild. I keep an upgrade for next winter: route the EDP vent line through the firewall so that its outlet gets further away from the heat of the exhaust stack.

Anxious to get back home to work on this. Stay Tuned!


Saturday 25 June 2016

Side panel brackets

Flight tests at work being quite demanding lately, I can barely work on the Pitts. Last week-end, I had a few hours to work on the aluminium brackets that snap on the top longerons to attach the side panels.

They originally had nyloc nutplates. I decided to change them to all metal nutplates for multiple reasons:

- The rivet holes on the brackets were not dimpled, therefore the rivets were chafing with the aluminium panels
- Nyloc may not be reused if the nylon doesn't provide enough friction (AC43-13)
- All metal nutplates are smaller and lighter

Took me a few hours to drill the old rivets, dimple all rivet holes, dimple all new nutplates and squeeze all the new rivets in place. I used a hand rivet squeezer from my friend Scott both for doing the dimples and rivet squeezing. My friend Marc also helped in replacing the nutplates on the rear brackets. Thanks Scott and Marc!

Here is the new vs old nutplate comparison:


I may have to partially tap the nutplate threads as they are pretty tight. I'll see once I will try to reinstall the side panels. Here is the result once snapped on the fuse:


Will stick some anti-chafing tape on the brackets before reinstalling the panels. I'm thinking of replacing  nutplates also on the vertical braces (right of the above picture), but the access may be challenging for dimpling and riveting. 

Mission for next work session at the hangar: install the main fuel tank.