Before doing the W&B, I rigged the wings using the recommended procedure in the Christen Eagle AFM.
From past experience, a biplane wing rigging is never a straightforward process. Since I was crazy enough to buy a digital torque wrench, it gives me the possibility to quite quickly and accurately read the wire tension (along with the tool from Holloway Engineering). I therefore made an experiment: record all wire tensions for every iteration of the tensioning process on one side. This way I was going to hopefully capture the converging tendencies and learn as much as possible to hopefully ease future riggings.
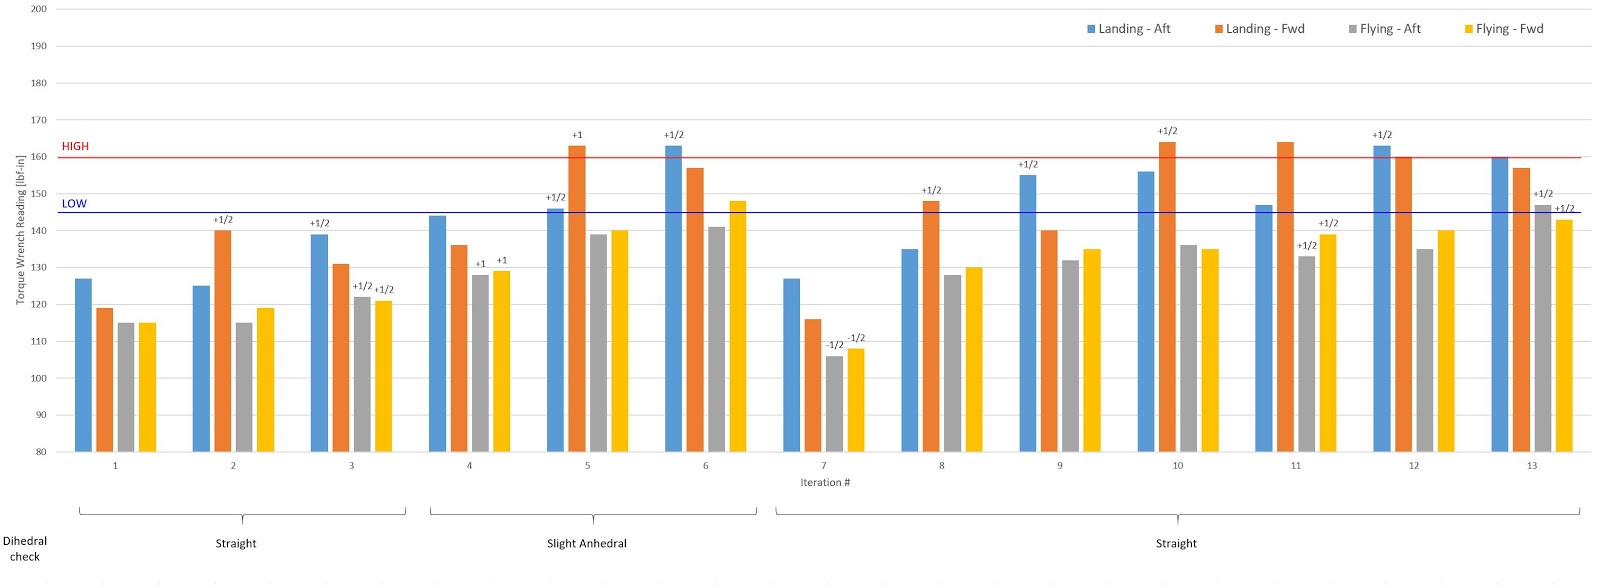
The following graph summarizes the results I got during the tensioning of the RHS wing wires. Each bar height is proportional to the wire tension. When a label exists above a bar, it means this wire has been adjusted compared to the last iteration. For example, on iteration 2, the fwd landing wire has been tightened by 1/2 turn. Negative values mean wire loosening. The brackets on the bottom indicate the results of the readings from the level I placed over the top wing front spar.
I could note/confirm the following trends for my aircraft:
- When tensioning one wire in a pair, the other wire of the same pair often looses tension (see landing wires during iterations 1,2 and 3)
- Adding tension can be done relatively gradually whereas removing tension can easily be drastic (see iteration 7)
- Adding tension on the flying wires does not significantly add tension on the landing wires (see iteration 4)
- Adding tension on the landing wires can have more of an effect on the flying wires (see iterations 5 and 6)
- Building tension on the flying wires has to be done with care since it can bend the wing and cause undesireable anhedral. In this example, I caused a slight anhedral up to iteration #6, then I removed tension on the flying wires on iteration #7 to remove the anhedral. In other words, it seems to be preferable to tighten the flying wires only when there is already quite some tension on the landing wires.
After iteration #13, I switched to other side to tension the LHS wing, then when back to RHS and did small adjustments to get within tolerances. After all that, I measured the wing incidences with the rigging boards and quite happily confirmed they were within tolerance too! This seems easy to summarize, but the whole process took me around 2 days of work.
I do not pretend the above is applicable to any other biplane, but perhaps a potion of the above findings can help others : )
Next step: the first engine startup. Stay tuned!
Next step: the first engine startup. Stay tuned!
Hi, which digital torque wrench did you buy ? Thanks!
ReplyDeleteSorry I missed your comment! It is a snap-on 3/8" flex-head Techwrench.
ReplyDelete