Showing posts with label Engine. Show all posts

Tuesday, 18 January 2022

Recap on Engine Installation

When I left this blog few years ago, I didn't take the time to write on my engine installation after the Titanium firewall was complete! Before getting into other topics, I will just wrap up this chapter first.

It went fairly smoothly since there was no change to the accessories and hoses. Again, I found easier to mount all of them as well as the engine mount while the engine was still on the hoist. Then I could precisely position the FWF assembly against the firewall with the help of my dad and the engine leveler:


While the engine was gone in the shop for repair, I also took the opportunity to modify by exhaust to provide more support. When I bought the airplane, the whole stack was held only by the cylinders, and each time I was pulling Gs, I had this fear of having a cracked exhaust after my flight.

I looked at several attachments on other aircraft, including some fancy ones linked to the engine mount with springs to allow movement... It seemed overly complicated to me since I did have attachment points available directly on the engine oil sump. This didn't require springs since the exhaust is moving with the engine.

I spent quite some time looking at the engine to find the easiest way to hook the exhaust. Took some cardboard to simulate small brackets. I ended up with two brackets, one for each pair of my crossover exhaust. 

I gave precise instructions to my welder in order to add two lugs to the exhaust with my desired angles. I then took the exhaust for ceramic coating since I got rid of the fiberglass wrapping and wanted to mitigate the risk of high cowl temps. Once I got everything back in the hangar, I was pleased with the fit of the exhaust with my new SS brackets:


Another fix that helps quite a bit my peace of mind!

One other thing that was long overdue was the making of new baffles. The old ones were patched, cracked and the baffle seal was all dried up.

Never underestimate the amount of time required to make new baffles from scracth... Took me in average a day for each baffle panel. Used all sorts of tools like an air nibbler to make the first rough cut and then a beverly shear for the finish cut. My friend Scott's tools were again very useful!


I used the old baffles as a template basis, with cardboard at some locations where I wanted an extension of the metal to better follow the cowl's inner shape. Lots of trial and errors, but perseverance paid off and I was quite happy with the end result:


Last step was to install the silicone baffling material (that's the fun part). I decided to use #4 screws with heat nuts instead of pop rivets to better control the pressure on the silicone material. This helped minimizing the ripple effect when excessively squeezed.


Once the baffles were finished, I painted them to protect them against corrosion, Reinstalled all panels and cowling, made a good wash to the airplane, weighed it and then went flying!

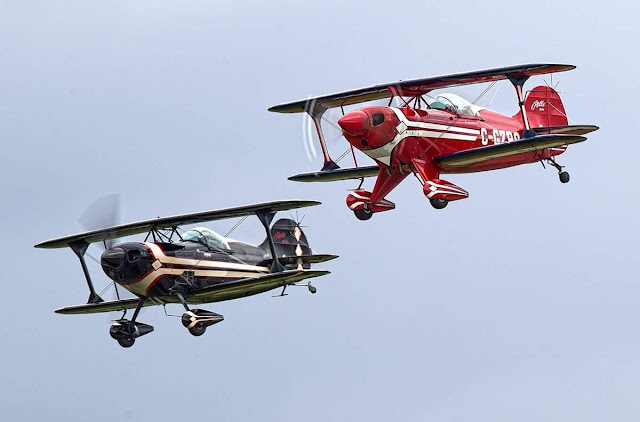
It felt so good to get back in the air again. Here's a few shots taken by Stephen J. Thorne (awesome photographer) in Gatineau (CYND). Formation was with my friend Peter Ashwood in his beautiful S-1T:


...Now back to 2022 winter! With my house almost done, I can finally get back in airplane mode and I have the following plans for this winter:

- New Spinner 
- New Lexan belly
- Battery relocation 
- ELT 406 installation
- AV30 + TailbeaconX installation

That's quite a bit for this winter but hopefully I can get all of this done in time for the spring weather!

Thanks for reading!


Saturday, 22 April 2017

First run up!

The aircraft was fueled, all parts were on the airplane except the cowl. Here are the checks I made in preparation for the first engine run:
  • Made sure all screws were fully secured on all panels; this thing blows
  • Fuel boost pump check and wobble pump check (using fuel return line w/ purge valve)
    •  The noise from both the boost pump and wobble pump was suggesting air was in the system. Took several wobble pump strokes until all cavities were filled with fuel, with no variation in noise.
    • Found a small leak at the wobble pump outlet. Tightened fitting a little more and it stopped.
  • Injector check: #2 cylinder was getting slightly more fuel than the others. Ordered a smaller retristrictor from Airflow Performance, but left it as is for the first run.
  • Attached the oil cooler with lockwire to make sure it doesn't flop around.
  • Plugged battery overnight before
  • Overall inspection
  • Briefed procedure in case of fire or other major engine/prop issue
The plan was then to:
  • Roll the airplane outside and attach it to the car (brakes should work, but I haven't fully tested them yet)
  • Put wheel chocks in
  • Bring a fire extinguisher not too far
  • Make a first run, checking:
    • oil pressure/temp
    • proper functioning of the throttle/mixture cables
    • mag drop
    • External inspection for leaks
  • Make subsequent adjustments to idle mixture (which tipically requires many starts/stops) and check proper functioning fot he new T-30 tachometer
Sticking to the above plan worked well. The engine started quite well on the first attempt; see video below. I got great help from my dad and my friend Luc to prepare the setup and supervise the first engine run. Big thanks to you both!


We identified one oil line fitting that needed to be tightened a little more, which I did. There was also a fuel drain valve below the fuselage that was slightly leaking, but other than that, I was very pleased with the result of the first run. The new tachometer worked also very well (I used the 47k ohm resistors). We did make a few more runs to adjust the idle mixture since it was a little rich.

What a day, thanks again to my helpers to cross this great milestone!

Sunday, 5 June 2016

Intake pipes

Haven't been posting for a while. Business trips and the sale of the Citabria took some time. Leaving again today for work, but I could spend a few hours in the hangar yesterday to install my intake pipes.

I removed them and had them chromed back in 2014, before I discovered about the crack:


I carefully removed the old gaskets stuck on the cylinder heads with a sealant removal scraper as well as a razor blade. I used Aerograde Hylomar to seal the new gasket in place. I also changed the o-rings that seal the tube with the air distribution box. I lubricated the new o-rings with Parker lube before installation. When an o-ring looks like an onion ring, it's time to change it:


Once all 4 pipes installed:


My plan is to work on the fuel system next. Stay tuned!

Saturday, 14 May 2016

Engine back to where it belongs

Yesterday I finished assembling the firesleeves. Sliding them on the hoses was easy when the hose was with straight or 45° ends, but impossible on a hose that has two 90° elbow hose ends. Perhaps I should have chose bigger firesleeves for these hoses... Anyway, two of them were like this so I had no choice but to dismantle one end for these. Note to myself: install the firesleeve before assembling a hose with two 90° hose ends!

Installing the SS zip ties went smoothly with a special tool I borrowed to my friend Scott. I followed EAA video here to install them.

Today, I installed the hoses on the engine and made the last checks to make sure the engine was ready to be reinstalled on the fuselage. Once ready, I could finally roll the hoist towards the fuse. I asked for the help of my father to align everything up. Thanks dad!


With the bolts in place in the fuselage, we found that using Quick Grips to gradually squeeze each of the four engine mount attachments to the fuse worked quite well. The engine leveler helped a lot to adjust the pitch angle of the engine. After about an hour, all four AN6 bolts were securely fasten with their cotter pins. It felt so good to pull the hoist back and lower the tail. Here is what my little bird looked like at the end of the day:


As you can see on the floor, I had my fuel tanks painted by a new friend of mine, Jocelyn, who kindly offered me to paint them in his paint booth. Thanks Joe! Here is a closer look:


With the engine installed, it opens the door for many other tasks like fuel system installation, engine controls, electrical system, etc. I am not sure yet what I will start, but it's getting exciting!

Sunday, 20 March 2016

Mags Overhaul

Received my overhauled mags last week. They were working ok but since they had just passed 500h and I couldn't find any trace of maintenance on them in the logs, I decided to make preventive maintenance and send them as recommended by my friend François. It turned out it was a good idea; one mag had a broken case and a magnet pitted by corrosion!


Both flanges were cracked like this:

Corroded magnet shaft:


Newly overhauled mags with the following replaced by new:

  • one casing
  • one magnet
  • new contacts
  • new capacitors
  • impulse coupling spring
  • and a bunch of little brackets and parts all in the bag shown on the first picture of this post


Thanks to Luc from BL Aviation for his great service!