Showing posts with label Firewall. Show all posts

Tuesday, 18 January 2022

Recap on Engine Installation

When I left this blog few years ago, I didn't take the time to write on my engine installation after the Titanium firewall was complete! Before getting into other topics, I will just wrap up this chapter first.

It went fairly smoothly since there was no change to the accessories and hoses. Again, I found easier to mount all of them as well as the engine mount while the engine was still on the hoist. Then I could precisely position the FWF assembly against the firewall with the help of my dad and the engine leveler:


While the engine was gone in the shop for repair, I also took the opportunity to modify by exhaust to provide more support. When I bought the airplane, the whole stack was held only by the cylinders, and each time I was pulling Gs, I had this fear of having a cracked exhaust after my flight.

I looked at several attachments on other aircraft, including some fancy ones linked to the engine mount with springs to allow movement... It seemed overly complicated to me since I did have attachment points available directly on the engine oil sump. This didn't require springs since the exhaust is moving with the engine.

I spent quite some time looking at the engine to find the easiest way to hook the exhaust. Took some cardboard to simulate small brackets. I ended up with two brackets, one for each pair of my crossover exhaust. 

I gave precise instructions to my welder in order to add two lugs to the exhaust with my desired angles. I then took the exhaust for ceramic coating since I got rid of the fiberglass wrapping and wanted to mitigate the risk of high cowl temps. Once I got everything back in the hangar, I was pleased with the fit of the exhaust with my new SS brackets:


Another fix that helps quite a bit my peace of mind!

One other thing that was long overdue was the making of new baffles. The old ones were patched, cracked and the baffle seal was all dried up.

Never underestimate the amount of time required to make new baffles from scracth... Took me in average a day for each baffle panel. Used all sorts of tools like an air nibbler to make the first rough cut and then a beverly shear for the finish cut. My friend Scott's tools were again very useful!


I used the old baffles as a template basis, with cardboard at some locations where I wanted an extension of the metal to better follow the cowl's inner shape. Lots of trial and errors, but perseverance paid off and I was quite happy with the end result:


Last step was to install the silicone baffling material (that's the fun part). I decided to use #4 screws with heat nuts instead of pop rivets to better control the pressure on the silicone material. This helped minimizing the ripple effect when excessively squeezed.


Once the baffles were finished, I painted them to protect them against corrosion, Reinstalled all panels and cowling, made a good wash to the airplane, weighed it and then went flying!

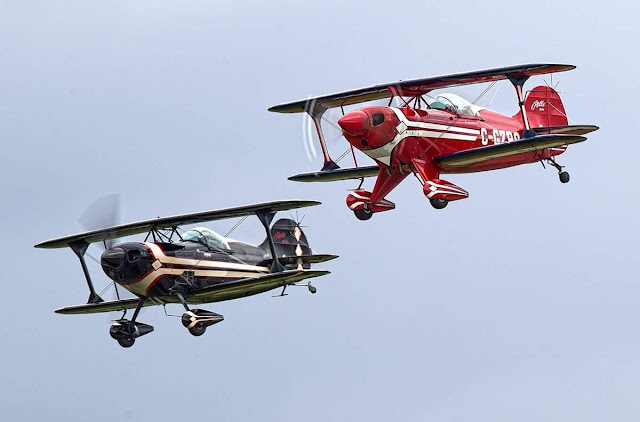
It felt so good to get back in the air again. Here's a few shots taken by Stephen J. Thorne (awesome photographer) in Gatineau (CYND). Formation was with my friend Peter Ashwood in his beautiful S-1T:


...Now back to 2022 winter! With my house almost done, I can finally get back in airplane mode and I have the following plans for this winter:

- New Spinner 
- New Lexan belly
- Battery relocation 
- ELT 406 installation
- AV30 + TailbeaconX installation

That's quite a bit for this winter but hopefully I can get all of this done in time for the spring weather!

Thanks for reading!


Saturday, 28 April 2018

Titanium Firewall Part II

Once I finally got the engine back, I decided to make a firewall template out of coroplast before drilling my new titanium firewall (thanks to my friend Mathieu Gratton for the idea!).


This allowed me to try different hole locations and converge on routings for hoses, controls and wires that I was happy with. Took a lot of notes directly on the template for me to remember all details as I was trying each setup. 


I used the green tape on the coroplast to mark the location of the structural members of the fuselage. This helped to avoid holes or nutplates at a wrong location!

For the most critical elements like throttle and mixture cable holes, I placed the engine  as close as possible to its final location (the engine leveler helped a lot for that):


After taking some time to look at all this I decided to relocate the starter solenoid as well as the voltage regulator which were both mounted on the firewall before. The battery being behind the seat, it makes more sense to have the unprotected cable between the battery and starter solenoid as short as possible (I don't have a master solenoid). Also, after looking at specs from B&C aero, it is generally recommended to locate the voltage regulator behind the firewall for cooling reasons.

Once I figured out where I wanted all holes to be drilled, I transferred the final markings to the titanium firewall and drilled all I could using the press drill. Obviously some holes were too far from the edge so had to use a hand drill for these. Most of the holes were easy to drill with cobalt bits. The larger diameter holes were more of a challenge. Biggest hole was 1.0 inch. I used a unibit but it required patience since titanium is quite hard. Clamping the Ti sheet to a thick piece of wood helped. I also used cutting oil between each step and reduced the drill rpm as the hole was gradually getting bigger. Slowly but surely, I finally got there.

Last step was to install the nutplates. I also decided to rivet reinforcing brackets at two locations where more stiffness was required: behind the 802 oil valve and behind the brake fluid reservoir. I used a C-frame to make dimples and riveting (thanks to my friend Scott!)

As a comparison, here is the old SS firewall a.k.a. swiss cheese firewall:


Here's the wannabe firewall:


...and the final result:


Much less of a swiss cheese now : ) Next step is the engine installation!

Monday, 16 April 2018

Titanium Firewall Part I

While the engine was gone last year, I decided to take the opportunity to make a new firewall since the old one had many unused holes that were plugged. In fact it looked more like a slice of swiss cheese rather than a firewall.

The old material was a 0.025" thick sheet of stainless steel. When browsing on the biplane forum, I saw that some builders were using titanium to save weight! Since my airplane is a little nose heavy, switching to Titanium was killing two birds with one stone.

In order to select the material thickness, some guidance exists under FAA 14 CFR 23.1191 which says:

(h) The following materials may be used in firewalls or shrouds without being tested as required by this section:

[...]

(6) Titanium sheet, 0.016 inch thick.

I therefore proceeded an ordered a sheet of 0.016" thick titanium from Titanium Joe. Great service and quick shipping. First impression: ok Titanium is VERY light.

I used the shape of the old firewall to draw and cut the titanium sheet to the desired shape. I cut the biggest parts on a heavy duty straight shear and cut to final shape with curves using a shear similar to this:

Image result for metal shear

Then I drilled the holes for the aluminum frame rivets them using a cobalt drill bit and the old firewall:


When looking at my neighbour Luc with his Pitts S-2C, I realized the lower edge of his firewall was actually bent with a large radius in order to reduce air restriction and make it easier for the warm air to get out of out of the cowl. My old setup had a sharp edge corner which obviously created a lot of turbulence and air restriction. I didn't especially had oil temperature or cylinder temperature problems, but since I may relocate my oil cooler eventually, I thought I was putting all chances on my side to make a large radius bend like on the S-2C. Easier to block air down the road rather than to unrestrict it!

In order to block the gap between the radius and the flat adjacent areas, I had to make small brackets using the leftover titanium:


Here is the result after the aluminium frame was transferred to the titanium firewall and the work on the bottom edge complete:


Next step was to locate and drill the required holes. I didn't want to blindly copy/paste the old hole locations so I prefered to wait until the engine was back before proceeding... To be continued!